This is the second post in a series about moving to Onedrive for Business and/or Sharepoint Online from traditional fileshares and/or homedirectories, in bulk, without user interaction.
- Making your data compliant with Office 365 standards, and keeping it that way
- Moving the data (in bulk)
- User and endpoint transitioning
Many of my employer’s clients are transitioning to a Cloud First IT model. Think triple A, work anywhere, anytime, anyplace.
In the previous post, we’ve talked about requirements, making your data compliant and essentially preparing your environment for migration. Now that you’ve done that, your data should be in a more or less consistent state, it’s time to move it to the cloud!
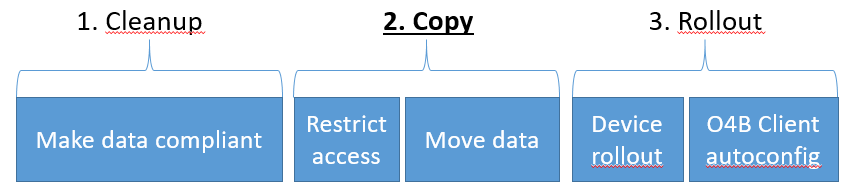
1: you’ll need to decide if you want to move all your users at once, or in groups.
Whichever you choose, you have to gather their usernames and the paths to their homedirectories and communicatie a time to migrate to them. It’s best to build a CSV file with 2 columns into which you can put this data. If you’re not moving all users at once, make multiple files, you’ll need these in step 4.
2: restrict access to data
While you’re moving data, you don’t want new data to be added or current data to be changed. Depending on the way your users currently access their data, this may be as simple as setting a number of folders to ‘read-only’. Your users will still be able to read from their homedirectories, but will no longer have access. This is also very easy to script if you’re dealing with a large number of users.
3: preparing Office 365
Normally speaking, admins do not have access to individual Onedrive folders. This has to be fixed. Secondly, Onedrive folders don’t exist until the user first logs into them. Have all of your users logged in and ‘touched’ their Onedrive?
Let’s assume neither is the case, but to add data to their Onedrive, you need both. Download and run O365Migrator (for free!) and click the ‘Provisioning’ and ‘Authorization’ tabs, it’ll handle everything for you automatically.
4: moving the data
Now that your environment has been prepared, you can start uploading the data. Note that Microsoft imposes limits on the bandwidth you consume, if you have very large quantities of data it may be advisable to migrate during a weekend or reduce the size of the groups you migrate. Using seperate accounts for simultaneous batch uploads also seems to greatly improve performance, but these accounts then both have to go through the previous step (3).
Simply run your CSV file from step 1 through O365Migrator and you’re done!
And no worries, if they changed their data since the last time you ran a ‘Verify’, O365Migrator runs a final correction on the data before it actually uploads anything.
Your users can now use the web portal, the Onedrive Client or Onedrivemapper to expose the data to your users.
Did you do a part 3 that I cant find? O4B autoconfig is aludeing me, Looks like it could be mostly Reg keys, but keen to know how you did it.