M365Permissions PowerShell Module

What does it do?

The M365Permissions PowerShell module creates a 360° view of permissions individual users have (including guests).

It will then generate a full XLSX report that contains ALL unique permissions. When run again later, it also shows all changed permissions!
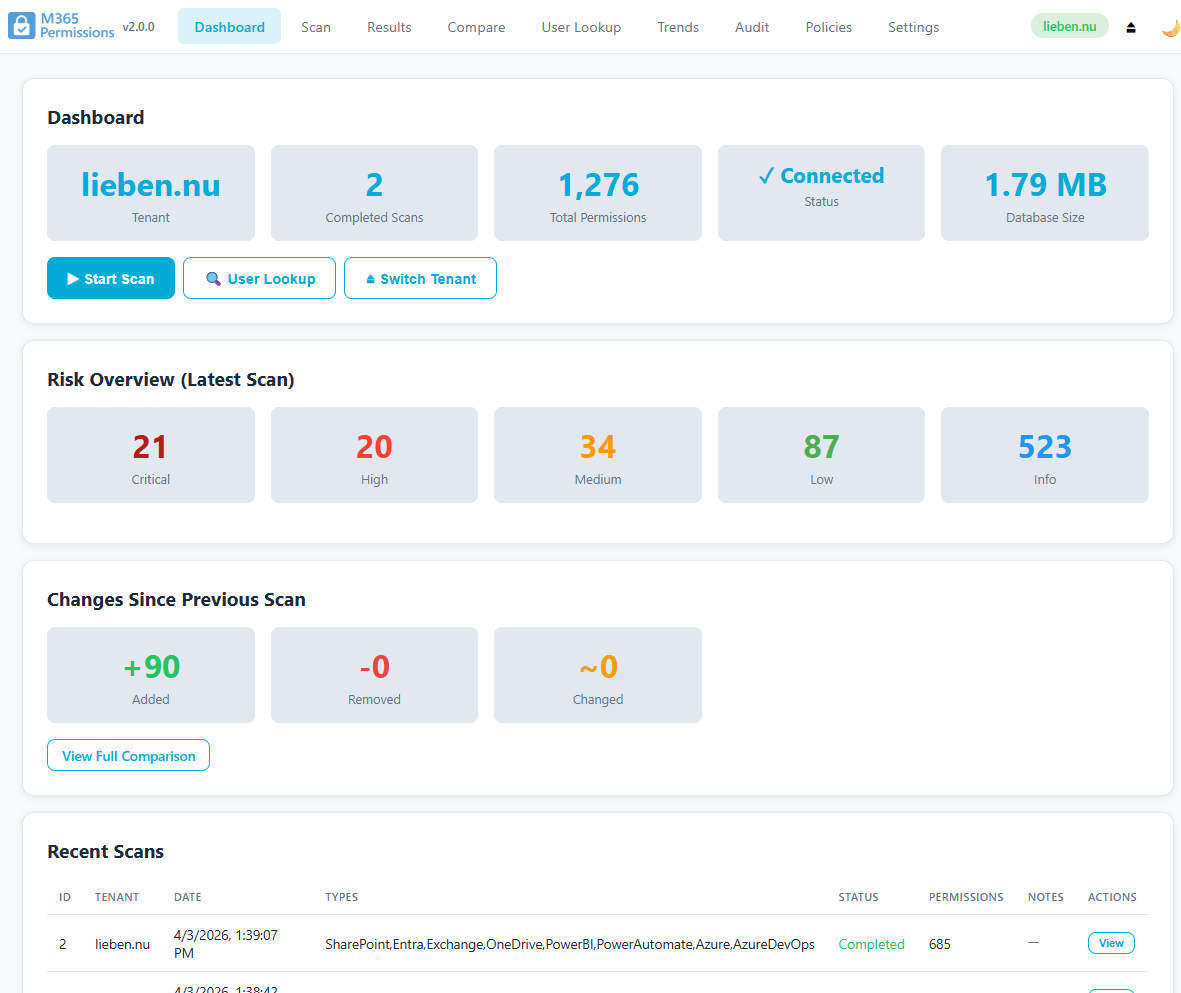
What resources are supported?

  • Onedrive For Business (files, folders, lists)
  • Sharepoint Online (files, folders, lists)
  • Teams (files, folders, lists)
  • EntraID admin & PIM roles
  • EntraID group ownership & membership
  • EntraID object ownership
  • EntraID hidden webhooks
  • EntraID service principals
  • EntraID applications
  • Exchange Admin Roles
  • Exchange Send On Behalf rights
  • Exchange mailbox rights
  • Exchange subfolders
  • Exchange Send As rights (incl non-mailbox objects)
  • PowerBI reports & datasets
  • PowerBI gateways & warehouses

Example output

SpO/Team permissions
Entra role report
mailbox folder permissions audit

Authentication / Access rights

The Entra Delegated Permission Flow ensures your credentials/tokens stay with you and are never seen by me.

Depending on what you report on, different permissions are required. On first run or after module upgrades you’ll be prompted to accept all potentially required permissions.

Result

The module exports to Excel by default (CSV is optional).

It runs in append mode for all reports run in a given day, tabs are added per resource.

To view a resultant set of rights for a given user or group (e.g. externals), you can use one of the built in table filters OR pivot one or more tables manually.

For convenience when doing an Entra scan all users and groups are also shown in a separate tab for cross referencing.

Diff (change detection)

Once you have data from multiple runs, they will automatically be compared (resulting in *delta report). If you want to manually run a delta detection to see which permissions were added or removed use the following function:

Get-ChangedPermissions

Performance

The module uses the fastest API’s available and by default 5 concurrent threads for the most time consuming parts (ExO and SpO). Especially for large libraries it can go up to 100000 items per minute, but for e.g. mailbox individual folder scans or onedrive workloads where there are lots of separate api calls the speed can go down to hundreds of items per minute.

To speed things up you can run each resource specific command in parallel in separate PowerShell windows, example:

Get-AllSpOPermissions -IncludeOnedriveSites -ExcludeOtherSites
Get-AllSpOPermissions
Get-AllEntraPermissions
Get-AllExOPermissions -includeFolderLevelPermissions
Get-AllPBIPermissions

BUT when you do this, the XLSX report won’t be generated automatically. When all functions complete, run Write-Report and it’ll merge the results into an XLSX.

I’ve tested with up to 10 threads working fine in large tenants but have also seen throttling issues worsen above 5 in smaller tenants. I recommend using 5 threads + 1 extra thread for each 1000 M365 licenses in your tenant.

Throttling does not cause most scans to fail, it just increases the time until completion. Since the different commands use different API’s and are throttled separately by Microsoft, running them concurrently is supported and faster.

Expand Groups

Generally it is not recommended to use -expandGroups for scans. This is due to the huge number of permission rows this can result in (especially if you have ‘all user’ groups…). The tab with users and their group memberships can easily be used to pivot resultant set of permissions for users based on their group memberships.

Install & run

Install-Module -Name M365Permissions -Force
Import-Module -Name M365Permissions
Connect-M365

This will open your browser to authorize your user, then you can start a scan!

If you prefer to use a service principal to scan, you’ll have to create one by using the Set-ScanPermissions command.

You should then use Connect-M365 -ServicePrincipal instead of just Connect-M365

You can also make this the default by running:

Set-M365PermissionsConfig -authMode ServicePrincipal

How / what to scan

#Run for EVERYTHING in your tenant:
Get-AllM365Permissions

#Get reports for the INT-Finance Department Team and show all individual users even if permissions were assigned to groups:

Get-SpOPermissions -teamName "INT-Finance Department" -ExpandGroups

#Get all permission for a specific Sharepoint site:

Get-SpOPermissions -SiteUrl "https://tenant.sharepoint.com/sites/site"

#Scan ALL SpO sites including Onedrive:
Get-AllSpOPermissions -siteUrl "https://tenant.sharepoint.com/sites/site"  -includeOnedriveSites

Configuration

You can run set-M365PermissionsConfig before calling any other function to finetune how this module behaves. Supported parameters:

  • maxThreads: default 5. Add 1 for each 1000 licensed users in your tenant.
  • outputFolder: configure this if you don’t want the output to automatically go to %appdata%\lieben consultancy
  • Verbose: default $False, set to $True if you want a very chatty module
  • includeCurrentUser: default $False, set to $True if you want to include the audit account in reports (very noisy)
  • outputFormat: default XLSX, set to CSV if XLSX is not your thing. CSV does not work with change detection.
  • defaultTimeoutMinutes: maximum allowed time to scan a single site or mailbox, only applies when using a get-All* function.
  • maxJobRetries: maximum number of times a failed job is retried. Jobs that time out are NOT retried.
  • autoConnect: automatically connect when loading the module (no need for connect-m365)
  • LCClientId: client ID of the SPN to use when using authMethod ServicePrincipal
  • LCTenantId: TenantID of the tenant to scan
  • authMode: Delegated (using logged in user) or ServicePrincipal (requires service principal setup first using set-scanPermissions)
  • logLevel: less or more logging to screen or even file at Full. Recommended: Normal or Minimal. None will not even show errors and warnings making the module almost completely silent.
  • respectSiteLocks: default $False, will temporarily remove ReadOnly sharepoint site locks so it can scan the site, and replace the lock after the scan completes.

get-M365PermissionsConfig will in turn show you what the current settings (including default settings) look like.

Interpreting the data

In-depth knowledge of Entra, Sharepoint, Exchange etc is required but contextual knowledge of an environment is also mandatory (e.g. which groups or sites are sensitive, which mailboxes and users etc etc).

But to get you started, some easy filters that almost always warrant a look:

  • ExO permissions for the ‘Default’ PrincipalName, especially anything other than ‘AvailabilityOnly’. Default means everyone can access it.
  • Entra role assignments for principalType ‘servicePrincipal’
  • Entra role assignments for sensitive roles
  • SpO items of type ‘ORG-WIDE’
  • SpO items of type ‘ANYONE’
  • PowerBI items of principalName ‘Whole Organization’

Issues and Feature requests

Please use Github to report issue or create feature requests. Please participate if you can code yourself. For those who add significant contributions to this project, I will lift the commercial use restriction (case by case review).

Notes

Required PS modules: PnP.PowerShell, ImportExcel

Running multiple times will append data if you don’t move the (xlsx, csv) file. Note though that when you open the xlsx, excel will lock the file and prevent additions. Make a copy first if you want a sneak peak while the scan is running.

Rate limiting

Microsoft may throttle a scan in certain situations, e.g. your user is also running other scripts at the same time or you’re doing many concurrent tasks.

Mike Oneill has a great tip on temporarily increasing the limits for Exchange Online (useful when using -includeFolderLevelPermissions)

Microsoft 365, Azure, Automation & Code